Friday, April 30, 2010

Dresser Re-Do Part 1

I got this old dresser for $10, it was worn and had some slight damage. I decided with a little work it could become a pretty cool piece! It has a nice body structure, pretty retro details which I'm a sucker for.


I started by sanding it down. Remeber to always wear protective gear when using power tools! My next step will be to putty that unsightly hole on the side and then add some paint. My goal is to leave just the bottom drawer and turn the others into shelves. I want this piece to end up in my kitchen so we'll see how it goes. Wish me luck!


Wednesday, April 28, 2010

Birthday Cakes

When I first got married I did not know how to bake a cake. My DH had to eat a birthday cake one year with the middle missing because it didn't cook right. He didn't complain, just thanked me for the part he could eat. Since we've had children, I've made it a point to get better at baking because I remember how mucha homemade cake meant to me on my birthday. There have been successes, there have been failures but I keep moving forward and try to improve. Here are a few of the cakes I've made throughout the years.


This was my first attempt at a decorative cake, rather sad, I know. It was made for my son's 1st birthday. Oh, that's supposed to be a firetruck for those who can't tell. Don't feel bad, I know it sucked.


Getting better! This was made for my daughter's 2nd birthday.


This was for my daughter's 3rd birthday.


This was for my son's 5th birthday. It was modeled after the cartoon of the Transformer Bumblebee in case you can't tell.

Tuesday, April 27, 2010

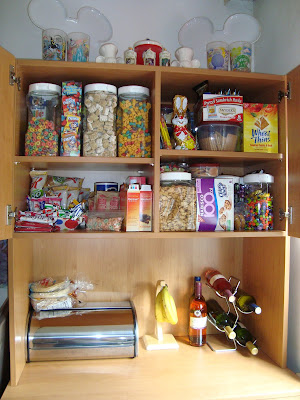
Organized Cupboards Make Me Happy


I know, it obviously doesn't take much to make me happy but who's heart doesn't flutter when they open a cupboard to find it beautifully organized? A little extreme? Maybe, but it is so much easier to find things and make a grocery list when everything has a place. Now, if onlt it would stay that way!

Saturday, April 24, 2010

Guess Where?

Ziploc Omelete

Set out the eggs and a variety of omelette ingredients. Here are some of my favorites:


Have each person write their name on the outside of a ziploc bag. I do not suggest using generic brand bags as we had issues with them melting or splitting open in the water. Crack 2 eggs (large or jumbo) into each bag (no more than 2). Mash and shake well to combine.

Fold the top edge down so the bag will remain open. Have each person add their favorite ingredients into their own bag. Remove all air from the bag and zip it up! Shake well to combine all ingredients.


Place the bags into rolling, boiling water for EXACTLY 13 minutes. You can usually cook 6-8 omelets in a large pot.

Open the bags and the omelet will roll out easily. Prepare for everyone to be amazed!

These can be prepared in the bags the night before and in the morning it's 13 minutes to breakfast!

Friday, April 23, 2010

Stuffed Flank Steak

Every once in a while I will make a recipe that tastes so good that I can't believe I am the one who made it. This was definitely one of those. I am a big fan of blue cheese and will usually try a recipe just because it had blue cheese as an ingredient. The ingredient combination of this recipe is fantastic, even the leftovers were great! I did not have the twine so we improvised and just rolled them up.

Ingredients
1 flank steak (1-1/2 to 2 pounds)
1 package frozen chopped spinach, thawed
1/2 cup crumbled blue cheese
1 jar (7 ounces) roasted red peppers, drained and chopped
2 tablespoons seasoned dry bread crumbs
1 egg yolk
3/4 teaspoon garlic salt
3/4 teaspoon ground black pepper
1 tablespoon olive oil


Directions
1. Heat oven to 425 degree F.
2. Lay steak on work surface. Holding sharp knife parallel to work surface and starting at a long side, slice flank steak in half to opposite long side, without cutting all the way through; open up the steak like a book. Flatten slightly to an even thickness.
3. Squeeze liquid from spinach; discard liquid. In medium-size bowl, combine spinach, cheese, peppers, bread crumbs, egg yolk, 1/4 teaspoon each of the garlic salt and the pepper.
4. Season steak with an additional 1/4 teaspoon each of the garlic salt and pepper. Press filling onto steak, leaving a 1-inch border on all sides. Roll up steak to enclose filling, beginning on a short side; the grain of the meat will be running from left to right. Tuck any loose filling back into ends.
5. Tie steak with cotton twine at 2-inch intervals to secure. Rub outside with oil, then sprinkle with remaining 1/4 teaspoon each garlic salt and pepper.
6. Roast at 425 degree F for 35 minutes, then increase heat to broil and broil for 10 minutes, turning once. Let meat rest 15 minutes. Remove twin, slice and serve.

Nutrition Facts
Calories 305, Total Fat 15 g, Saturated Fat 6 g, Cholesterol 92 mg, Sodium 588 mg, Carbohydrate 7 g, Fiber 2 g, Protein 36 g.
Percent Daily Values are based on a 2,000 calorie diet


My Blog Has A Facebook Page!

Now you all can lovingly follow me on facebook, too! I know, you're just thrilled to pieces!

A Rockabilly Mom Facebook Page

You can also find my page badge on the side of my page!

Thursday, April 22, 2010

Celebrating Earth Day


I do believe we should make a daily effort to make the Earth a better place to live and I enjoy Earth Day because it is a great reminder to do what is good! This year we bought our first compost bin! I am so excited to get it started and feel great that I have taken one more small step in protecting the beautiful Earth I live on. What did you do to celebrate Earth Day 2010?

Monday, April 19, 2010

Wooden Shoe Factory and Cheese Farm

I had to add pictures of this on here because this place had the most amazing cheese I have ever tasted! They were very nice to give us an English demonstration of how to make a clog and let us take it home! I bought a wheel of parmesean and will have to decide on a way of making the most of it. Cheese this good cannot just be wasted on just anything!


Keukenhof

The day after we went to Amsterdam, we visited the Keukenhof which is the world famous flower garden in The Netherlands. Here are some great pictures I got. There's a LOT more but these were some of my favorites. I'll try to link a Picasa album or something later.


Sunday, April 18, 2010

Amsterdam

We took a little day trip up to Amsterdam this weekend. Here are some pics I took, enjoy!


Sign means "Amsterdam Loves Bikes"

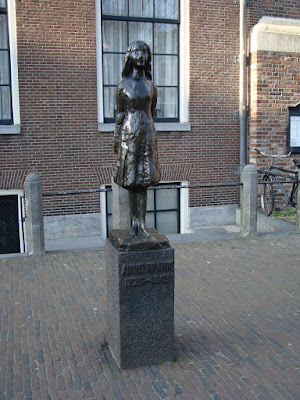
Anne Frank's "Secret Annex"

Anne Frank statue

Just a beautiful house

Canal houses

Friday, April 16, 2010

All-Natural Play Clay


This is another Family Fun find, I love that magazine! I did turn out fairly dry but nothing some extra water couldn't fix! We made the brown (chocolate) clay but, as you can see in the directions below, there are different options. Try experimenting to see what different colors you can come up with!

Materials
1 cup flour
3/8 cup salt
1 tablespoon vegetable oil

Natural Dye
BROWN: 3/8 cup plus one tablespoon hot water and 4 tablespoons cocoa powder
FUCHSIA: 3/8 cup hot beet juice (we used the liquid from a 15-ounce can of beets)
ORANGE: 3/8 cup hot water and 1 tablespoon paprika
YELLOW: 3/8 cup hot water and 1 teaspoon turmeric

Instructions
In a medium-size bowl, combine the flour and salt. Pour in the oil and your chosen natural dye, and stir well.

Knead the dough on a floured surface for a few minutes. If the clay is too soft, add a bit more flour.

Store the clay in airtight containers in the refrigerator.

Wednesday, April 14, 2010

Squid Dogs

I found this in an issue of Family Fun and knew my kids would love them and I was right! Maybe a little weird for the older group but my kiddos (ages 3 & 5) loved them. My son exclaimed after finishing his, "These are my favorite food!" Whatever makes you happy, dude!

Ingredients
Hot dogs
Dry spaghetti
Butter or ketchup (optional)


Instructions
To cook up a batch, simply cut a hot dog into sections, then spear the hot dog pieces with dry spaghetti.


Boil the spaghetti dogs until the pasta is tender. Serve with butter or ketchup, if desired.


My final product picture turned out blurry so this is all I have, sorry!

Tuesday, April 13, 2010

Pictures from Cochem, Germany


We took a little day trip to see the castle in Cochem, Germany and I thought I'd share a couple pictures I took. Enjoy!

Monday, April 12, 2010

Cheese Ravioli with Lemon Artichoke Pesto


This recipe takes your typical cheese ravioli to a whole new level! The artichoke pesto was delicious! We used a bag of frozen ravioli and cooked it so you can do fresh or frozen, up to you.

1 cup quartered canned artichoke hearts
2 large garlic cloves, minced
1/2 cup packed fresh basil
1/4 cup water
2 Tbs freshly grated Parmesan cheese
1 1/2 Tbs lemon juice
1 Tbs extra-virgin olive oil
1 tsp grated lemon peel
1/8 tsp salt
1/8 tsp freshly ground pepper
18 oz. reduced-fat cheese ravioli

1. Place all ingredients except ravioli in food processor; process until pureed.

2. Cook ravioli in large pot of boiling salted water according to package directions; drain. Return ravioli to pot; toss with pesto. Heat over medium heat 30 to 60 seconds or until heated through.

6 (1-cup) servings

PER SERVING: 195 calories, 4.5 g total fat (2 g saturated fat), 8 g protein, 27 g carbohydrate, 25 mg cholesterol, 350 mg sodium, 3 g fiber

My Version Of Outback Steakhouse's Chopped Blue Cheese Salad

So, I am literally obsessed with this salad. I craved it with both of my pregnancies and the cravings have gotten worse since we moved to Germany. My loving DH decided to sign me up to make a salad for an award ceremony at the firestation and not tell me about it until the day before and I was clueless! There was no way I was going to show up with an ordinary salad so I started to think of salads I absolutely love. The chopped blue cheese salad from Outback popped into my head immediately and I knew that it was the one! I didn't have a list of ingredients when i went into the commissary, I had to go off of my memory of eating it but it turned out perfect and my dish was completely empty when I went up to get my food after the ceremony! So, here you go:

1 bag romaine salad mix, chopped
1/2 cup chopped pecans
1/3 cup crumbled blue cheese (small pieces)
1/4 cup sesame ginger dressing


I chop my salad and my pecans with my Pampered Chef® Food Chopper. Put everything into a medium size mixing bowl and toss until everything is well mixed. Serve either straight from the mixing bowl or in a more decorative bowl! The amounts the recipe calls for only yeilds 2 servings here for me and DH!

Campbell's Chicken Quesadillas


This is a recipe I'm pretty sure I tore out of a Seventeen magazine when I was around 18 years old and have been making it ever since! Ridiculously easy and oh so yummy! The cheddar cheese soup is what makes this recipe different than any other quesadillas I've cooked.

4 skinless, boneless chicken breast halves (about 1 pound), cut into cubes

1 can (10 3/4 ounces) Campbell's® Condensed Cheddar Cheese Soup

1/2 cup salsa

10 flour tortillas (8-inch), warmed


1.Heat the oven to 425°F.

2.Cook the chicken in a 10-inch nonstick skillet over medium-high heat until well browned and cooked through, stirring often. Stir in the soup and salsa. Cook until the mixture is hot and bubbling.

3.Spread about 1/3 cup chicken mixture onto half of each tortilla to within 1/2 inch of the edge. Brush the edges of the tortillas with water. Fold the tortillas over the filling and press to seal. Place the filled tortillas onto 2 baking sheets.

4.Bake for 5 minutes or until the quesadillas are hot.

Saturday, April 10, 2010

My love of Anne


I am a big fan of Anne Taintor. Her pictures are fantastic, vintage (which steals my heart), funny, and I can relate to so many of them. For these reasons, I have decided to post a picture of hers weekly on the blog. I hope you enjoy them as much as I do!

Tuesday, April 6, 2010

3 Tier Serving Tray

This is a great idea I got from Decor It Yourself. You make your own 3 tiered serving tray using plates and cups. There are many different styles in dishware you can choose from to make it your own but I decided on black and white to go with my kitchen. You can use plates and cups you have or random ones you pick up from garage sales or thrift stores.

The supplies you will need are 3 plates in different sizes, 2 cups in different sizes, Gorilla Glue, water, tape, a pencil and a few heavy books. Be very careful when dealing with Gorilla Glue and fully read the directions before starting.


Make sure your plates and cups are clean. Take the largest plate, find the middle and mark it with a pencil. Place your larger cup and place it centered over the pencil mark. Use tape to mark a square around your cup. Pick your cup up and inside the square, get the plate damp with the water. Put a thin line of Gorilla Glue on the bottom rim of your larger cup and place it on the plate where it is marked. Place a few heavy books on top of the cup and leave for 30 minutes.


When it had securely dried, get the medium sized plate, find the middle and get it damp around the area the top rim of the largest cup will be going. Put a thin line of Gorilla Glue on the top rim of the largest cup and set the medium plate on top of it. We chose to rest it upside down so we wouldn't have to worry about glue drips.


When it has securely dried, repeat the steps to attach the second cup and the third plate. When it has finally dried, you are ready for your next get-together! Here are pics of my final product: